Posts Tagged ‘PowerCLI’

Multiple vCenter Connections in PowerCLI

November 30, 2019

Connect-VIServer is a PowerCLI cmdlet which most of the PowerCLI scripts out there start with. It creates a connection to a vCenter server, which you can then use to run queries against a particular vSphere environment.

If you only need one vCenter connection, you don’t need to worry about how your subsequent PowerCLI cmdlets are ordered. They will all use this single vCenter by default for all requests. But if you need multiple simultaneous connections, you have to be more careful with you code or you can accidentally end up running commands against a wrong vCenter. Not a situation you want to find yourself in, especially if you’re making changes to the environment.

Goal of this blog post is to explain PowerCLI behaviour, when multiple vCenter connections are used. And how to best write your code to avoid common mistakes.

vCenter server parameter

If you are connected to more than one vCenter, the easiest way to specify which vCenter to use in a particular PowerCLI cmdlet is by using the -Server parameter. For example:

Get-VM -Server vcenter1.domain.local

By doing so, you will avoid any ambiguity in your code, since vCenter is always specified explicitly. This is the theory. In reality, I find, you will always have that one command where you forgot to provide -Server parameter, which will cause problems when you least expect it.

DefaultVIServer variable

If you’ve done any PowerCLI scripting before, you’ve most likely come across the $global:DefaultVIServer variable. When you connect to a vCenter using Connect-VIServer cmdlet, DefaultVIServer variable is set to that vCenter name. That way when you run PowerCLI cmdlets without using -Server parameter, they implicitly use vCenter from the DefaultVIServer variable as a target for the query. When you disconnect from the vCenter using Disconnect-VIServer, this variable is emptied.

The challenge with this approach is that the DefaultVIServer variable can only hold one vCenter name. If you connect/disconnect to/from multiple vCenter servers, you may end up in a situation where DefaultVIServer variable becomes empty, even though you still have an active vCenter connection. It’s easier to demonstrate it in the following script output:

Connecting to vCenter server vcenter1.domain.local
DefaultVIServer value: vcenter1.domain.local
Connecting to vCenter server vcenter2.domain.local
DefaultVIServer value: vcenter2.domain.local
Disconnecting from vCenter server vcenter2.domain.local
DefaultVIServer value:
Get-VM : 29/11/2019 6:17:41 PM Get-VM You are not currently connected to any servers. Please connect first using a Connect cmdlet.

As you can see, after we disconnect from the current default vCenter server vcenter2.domain.local, the variable becomes blank, until we connect to any other vCenter again. As a result, Get-VM cmdlet fails.

The error message is misleading. Connection is there and you can still run commands against the vcenter1.domain.local by specifying it in the -Server parameter. However, it defeats the purpose of DefaultVIServer variable, when using multiple simultaneous vCenter connections.

There is a way to fix that.

DefaultVIServer mode

This leads us up to the third option – changing DefaultVIServer mode. PowerCLI supports multiple default vCenter servers if you change DefaultVIServer to Multiple (default is Single):

Set-PowerCLIConfiguration -DefaultVIServerMode Multiple

As a result of this change, PowerCLI will start using DefaultVIServers array, which tracks all currently connected vCenters.

There are two implications of using Multiple connection mode:

  1. If you run a PowerCLI cmdlet without the -Server parameter, it will run against all connected vCenters at the same time – which is fine, as long as this is what you want.
  2. If you expect other users to run this script and they use Single connection mode, it can break your script. If that’s the case, make sure to explicitly set DefaultVIServer mode in the beginning of your script to avoid any unexpected behaviour.

Conclusion

Each option has its pros and cons. It’s up to you to choose what works best in your particular situation. But if you asked me, I would recommend disconnecting vCenter server session as soon as you no longer needed it. That way you can avoid any potential ambiguity in your code. Use multiple simultaneous vCenter connections only if you absolutely need it.

Troubleshooting vSphere Guest Operations API

October 4, 2019

What is vSphere Guest Operations

Recently I’ve been heavily utilizing vSphere Guest Operations API for automating vCenter patching. vSphere Guest Operations (GuestOps) is an API, which allows you to run commands on a virtual machine without needing to connect to it over the network. All you need is credentials to the vCenter managing the virtual machine and to the virtual machine itself.

GuestOps can be called by using an Invoke-VMScript PowerCLI cmdlet in the following format:

> Invoke-VMScript -ScriptText “uname -a” -vm vc01 -GuestUser root -GuestPassword VMware1!

Cmdlet will talk to the vCenter, vCenter will talk to ESXi host, ESXi host will talk to VMware Tools and, eventually, VMware Tools will run the command on the Guest OS.

It worked well for me when I was running commands on VCSA 6.0 VM (managed by another vCenter), but after patching and upgrading this VM to VCSA 6.7 I encountered the following error:

Error occured while executing script on guest OS in VM ‘vc01’. Could not locate “Powershell” script interpreter in any of the expected locations. Probably you do not have enough permissions to execute command within guest.

It’s obvious from the error message that cmdlet is doing something wrong, since it’s supposed to use bash in Linux, not PowerShell.

Enable Debugging in VMware Tools

To better understand what was going on, I logged in to VCSA via SSH and enabled VMware Tools debugging (see KB1007873 for instructions on how to do that) and restarted Open VM Tools:

# systemctl restart vmtoolsd.service

After running the Invoke-VMScript cmdlet again, this is what I noticed in vmsvc.log debug log:

[vix] VixTools_StartProgram: User: root args: progamPath: ‘cmd.exe’, arguments: ‘/C powershell -NonInteractive -EncodedCommand cABvAHcAZQByAHMAaABl…

So it wasn’t just a misleading PowerCLI error message, Invoke-VMScript was actually trying to call a PowerShell command using Windows command interpreter on a Linux VM.

Solution

My guess is that since VMware has changed underlying operating system on VCSA from SUSE Linux to Photon OS, Invoke-VMScript can no longer properly identify the underlying OS and defaults to Windows.

Simple solution to this problem is to give a helping hand to Invoke-VMScript cmdlet and specify interpreter using -ScriptType Bash parameter. This is what a proper resulting debug log message will look like:

[vix] VixToolsStartProgramImpl: started ‘”/bin/bash” -c “bash > /tmp/vmware-root/powerclivmware159 2>&1 -c \”uname -a\””‘, pid 7456

vSphere 6.0 REST API: A History Lesson

August 23, 2019

I’m glad to see how VMware products are becoming more and more automation-focused these days. NSX has always had rich REST API capabilities, which I can’t complain about. And vSphere is now starting to catch up. vSphere 6.5 was the first release where REST API started getting much more attention. See these official blog posts for example:

But not many people know that vSphere 6.5 wasn’t the first release where REST API became available. Check this forum thread on VMTN “Does vCenter 6.0 support RESTFUL api?”:

I think its only supported for 6.5 as below blogs has a customer asked the same question and reply is no..

It’s not entirely true, even though I know why the OP got a “No” answer. Let me explain.

vSphere 6.0 REST API

VMware started to make first steps towards REST API starting from 6.0 release. If you have a legacy vSphere 6.0 environment you can play with, you can easily test that by opening the following URL:

https://vcenter/rest/com/vmware/vapi/metadata/cli/command

You will get a long list of commands available in 6.0 release:

It may look impressive, but if you look closely you will quickly notice that they are all Content Library or Tagging related. Quote from the referenced blog post:

VMware vCenter has received some new extensions to its REST based API. In vSphere 6.0, this API set provides the ability to manage the Content Library and Tagging but now also includes the ability to manage and configure the vCenter Server Appliance (VCSA) based functionality and basic VM management.

That is right, in vSphere 6.0 REST API is very limited, you won’t get inventory data, backup or update API. All you can do is manage Content Library and Tagging, which, frankly, is not very practical.

Making REST API Calls

If Content Library and Tagging use cases are applicable to you or you are just feeling adventurous this is an example of how you can make a call to vSphere 6.0 REST API via Postman.

All calls are POST-based and action (get, list, create, etc.) is specified as a parameter, so pay close attention to request format.

First you will need to generate authentication token by making a POST call to https://vcenter/rest/com/vmware/cis/session, using “Basic Auth” for Authorization and you will get a token in response:

Then change Authorization to “No auth” and specify the token in “vmware-api-session-id” header in your next call. In this example I’m getting a list of all content libraries (you will obviously get an empty response if you haven’t actually created one):

Some commands require a body, to determine the body format use the following POST call to https://vcenter/rest/com/vmware/vapi/metadata/cli/command?~action=get, with the following body in JSON format:

{
	"identity": {
        "name": "get",
        "path": "com.vmware.content.library"
	}
}

Where “path” is the operation and “name” is the action from the https://vcenter/rest/com/vmware/vapi/metadata/cli/command call above.

If you’re looking for more detailed information, I found this blog post by Mitch Tulloch very useful:

Conclusion

There you have it. vSphere 6.0 does support REST API, it’s just not very useful, that’s why no one talks about it.

This blog post won’t help you if you are stuck in a stone age and need to manage vSphere 6.0 via REST API, but it at least gives you a definitive answer of whether REST API is supported in vSphere 6.0 and what you can do with it.

If you do find yourself in such situation, I recommend to fall back on PowerCLI, if possible.

vRealize Automation Disaster Recovery

January 14, 2018

Introduction

VMware has invested a lot of time and effort in vRealize Automation high availability. For medium and large deployment scenarios VMware recommends using a load balancer (Citrix, F5, NSX) to distribute traffic between vRA appliance and infrastructure components, as well as database clustering (such as MS SQL availability groups) for database high availability. Additionally, in vRA 7.3 VMware added support for automatic failover of vRA appliance’s embedded PostgreSQL database, which was a manual process prior to that.

There is a clear distinction, however, between high availability and disaster recovery. Generally speaking, HA covers redundancy within the site and is not intended to protect from full site failure. Site Recovery Manager (or another replication product) is required to protect vRA in a DR scenario, which is described in more detail in the following document:

In my opinion, there are two important aspects that are missing from the aforementioned document, which I want to cover in this blog post: restoring VM UUIDs and changing vRA IP address. I will cover them in the order that these tasks would usually be performed if you were to fail over vRA to DR:

  1. Exporting VM UUIDs
  2. Changing IP addresses
  3. Importing VM UUIDs

I will also only touch on how to change VM reservations. Which is also an important step, but very well covered in VMware documentation already.

Note: this blog post does not provide configuration guidelines for VM replication software, such as Site Recovery Manager, Zerto or RecoverPoint and is focused only on DR aspects related to vRA itself. Refer to official documentation of corresponding products to determine how to set up VM replication to your disaster recovery site.

Exporting VM UUIDs

VMware uses two UUIDs to identify a VM. BIOS UUID (uuid.bios in .vmx file) was the original VM identifier implemented to identify a VM and is derived from the hardware VM is provisioned on. But it’s not unique. If VM is cloned, the clone will have the same BIOS UUID. So the second identifier was introduced called Instance UUID (vc.uuid in .vmx file), which is generated by vCenter and is unique within a single vCenter (two VMs in different vCenters can have the same Instance UUID).

When VMs are failed over, Instance UUIDs change. Compare VirtualMachine.Admin.AgentID (Instance UUID) and VirtualMachine.Admin.UUID (BIOS UUID) on original and failed over VMs.

Why does this matter? Because vRA uses Instance UUIDs to keep track of managed VMs.  If Instance UUIDs change, vRA will show the corresponding VMs as missing under Infrastructure > Managed Machines. And you won’t be able to manage them.

So it’s important to export VM Instance UUIDs before failover, which can then be used to restore the original values. This is how you can get the Instance UUID of a given VM using PowerCLI:

> (Get-VM vm_name).extensiondata.config.InstanceUUID

Here, on my GitHub page, you can find a script that I have put together to export Instance UUIDs of all VMs in CSV format.

Changing IP addresses

Once you’ve saved the Instance UUIDs, you can move on to failover. vRA components should be started in the following order:

  1. MS SQL database
  2. vRA appliance
  3. IaaS server

If network subnets, that all components are connected to, are stretched between two sites, when VMs are brought up at DR, there are no additional reconfiguration required. But usually it’s not the case and servers need to be re-IP’ed. IaaS server network setting are changed the same as on any other Windows server machine.

vRealize Appliance network settings are changed in vRA appliance management interface, that can be accessed at https://vra-appliance-hostname:5480, under Network > Address tab. The problem is, if IP addresses change at DR, it will be challenging to reach vRA appliance over the network. To work around that, connect to vRA VM console and run the following script from CLI to change appliance’s network settings:

# /opt/vmware/share/vami/vami_config_net

Don’t forget to update the DNS record for vRA appliance in DNS. For IaaS server it’s not needed, as long as you allow Dynamic DNS (DDNS) updates.

Importing VM UUIDs

After the failover all of your VMs will have missing status in vRA. To make vRA recognize failed over VMs you will need to revert Instance UUIDs back to the original values. In PowerCLI this can be done in the following way:

> $spec = New-Object VMware.Vim.VirtualMachineConfigSpec
> $spec.instanceUuid = ’52da9b14-0060-dc51-4733-3b01e912edd2′
> $vm = Get-VM -Name vm_name
> $vm.Extensiondata.ReconfigVM_Task($spec)

I’ve written another script, that will perform this task for you, which you can find on my GitHub page.

You will need two files to make the script work. The vm_vc_uuids.csv file you generated before, with the list of original VM Instance UUIDs. As well as the list of missing VMs in CSV format, that you can export from vRA after the failover on the Infrastructure > Managed Machines page:

This is an example of the script command line options and the output:

You will need to run an inventory data collection from the Infrastructure > Compute Resources > Compute Resources page. vRA will discover VMs and update their status to “On”.

Updating reservations

If you try to run any Day 2 operation on a VM with the old reservation in place, you will get an error similar to this:

Error processing [Shutdown], error details:
Error getting property ‘runtime.powerState’ from managed object (null)
Inner Exception: Object reference not set to an instance of an object.

To manually update VM reservation, on Infrastructure > Managed Machines page hover over the VM and select Change Reservation:

This process is obviously not scalable, as it can take hours, if you have hundreds of VMs. VMware offers an alternative solution that lets you update all VMs by using Bulk Import feature available from Infrastructure > Administration > Bulk Imports. The idea is that you can export all VM configuration details in a CSV file, update compute and storage reservation columns and import back to vRA. vRealize Suite 7.0 Disaster Recovery by Using Site Recovery Manager 6.1 gives very detailed instruction on how to do that in “Bulk Import, Update, or Migrate Virtual Machines” section.

Conclusion

I hope this blog post helped to cover some gaps in VMware documentation. If you have any questions or comments, as always, feel free to leave them in the comments sections below.

References

[SOLVED] Migrating vCenter Notifications

January 6, 2018

Why is this a problem?

VMware upgrades and migrations still comprise a large chunk of what I do in my job. If it is an in-place upgrade it is often more straightforward. The main consideration is making sure all compatibility checks are made. But if it is a rebuild, things get a bit more complicated.

Take for example a vCenter Server to vCenter Server Appliance migration. If you are migrating between 5.5, 6.0 and 6.5 you are covered by the vCenter Server Migration Tool. Recently I came across a customer using vSphere 5.1 (yes, it is not as uncommon as you might think). vCenter Server Migration Tool does not support migration from vSphere 5.1, which is fair enough, as it is end of support was August 2016. But as a result, you end up being on your own with your upgrade endeavours and have to do a lot of the things manually. One of such things is migrating vCenter notifications.

You can go and do it by hand. Using a few PowerCLI commands you can list the currently configured notifications and then recreate them on the new vCenter. But knowing how clunky and slow this process is, I doubt you are looking forward to spend half a day configuring each of the dozens notifications one by one by hand (I sure am not).

I offer an easy solution

You may have seen a comic over on xkcd called “Is It Worth The Time?“. Which gives you an estimate of how long you can work on making a routine task more efficient before you are spending more time than you save (across five years). As an example, if you can save one hour by automating a task that you do monthly, even if you spend two days on automating it, you will still brake even in five years.

Knowing how often I do VMware upgrades, it is well worth for me to invest time in automating it by scripting. Since you do not do upgrades that often, for you it is not, so I wrote this script for you.

If you simply want to get the job done, you can go ahead and download it from my GitHub page here (you will also need VMware PowerCLI installed on your machine for it to work) and then run it like so:

.\copy-vcenter-alerts-v1.0.ps1 -SourceVcenter old-vc.acme.com -DestinationVcenter new-vc.acme.com

Script includes help topics, that you can view by running the following command:

Get-Help -full .\copy-vcenter-alerts-v1.0.ps1

Or if you are curious, you can read further to better understand how script works.

How does this work?

First of all, it is important to understand the terminology used in vSphere:

  • Alarm trigger – a set of conditions that must be met for an alarm warning and alert to occur.
  • Alarm action – operations that occur in response to triggered alarms. For example, email notifications.

Script takes source and destination vCenter IP addresses or host names as parameters and starts by retrieving the list of existing alerts. Then it compares alert definitions and if alert doesn’t exist on the destination, it will be skipped, so be aware of that. Script will show you a warning and you will be able to make a decision about what to do with such alert later.

Then for each of the source alerts, that exists on the destination, script recreates actions, with exact same triggers. Trigger settings, such as repeats (enabled/disabled) and trigger state changes (green to yellow, yellow to red, etc) are also copied.

Script will not attempt to recreate an action that already exists, so feel free to run the script multiple times, if you need to.

What script does not do

  1. Script does not copy custom alerts – if you have custom alert definitions, you will have to recreate them manually. It was not worth investing time in such feature at this stage, as custom alerts are rare and even if encountered, there us just a handful, that can be moved manually.
  2. Only email notification actions are supported – because they are the most common. If you use other actions, like SNMP traps, let me know and maybe I will include them in the next version.

PowerCLI cmdlets used

These are some of the useful VMware PowerCLI cmdlets I used to write the script:

  • Get-AlarmDefinition
  • Get-AlarmAction
  • Get-AlarmActionTrigger
  • New-AlarmAction
  • New-AlarmActionTrigger

Changing the Default PSP for Dell Compellent

April 26, 2016

dell_compellent
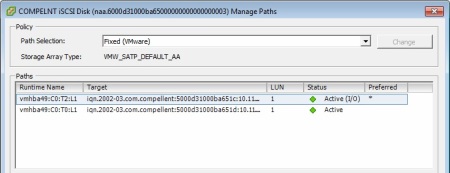
If you’ve ever worked with Dell Compellent storage arrays you may have noticed that when you initially connect it to a VMware ESXi host, by default VMware Native Multipathing Plugin (NMP) uses Fixed Path Selection Policy (PSP) for all connected LUNs. And if you have two ports on each of the controllers connected to your storage area network (be it iSCSI or FC), then you’re wasting half of your bandwidth.

compellent_psp

Why does that happen? Let’s dig deep into VMware’s Pluggable Storage Architecture (PSA) and see how it treats Compellent.

How Compellent is claimed by VMware NMP

If you are familiar with vSphere’s Pluggable Storage Architecture (PSA) and NMP (which is the only PSA plug-in that every ESXi host has installed by default), then you may know that historically it’s always had specific rules for such Asymmetric Logical Unit Access (ALUA) arrays as NetApp FAS and EMC VNX.

Run the following command on an ESXi host and you will see claim rules for NetApp and DGC devices (DGC is Data General Corporation, which built Clariion array that has been later re-branded as VNX by EMC):

# esxcli storage nmp satp rule list

Name              Vendor  Default PSP Description
----------------  ------- ----------- -------------------------------
VMW_SATP_ALUA_CX  DGC                 CLARiiON array in ALUA mode
VMW_SATP_ALUA     NETAPP  VMW_PSP_RR  NetApp arrays with ALUA support

This tells NMP to use Round-Robin Path Selection Policy (PSP) for these arrays, which is always preferable if you want to utilize all available active-optimized paths. You may have noticed that there’s no default PSP in the VNX claim rule, but if you look at the default PSP for the VMW_SATP_ALUA_CX Storage Array Type Plug-In (SATP), you’ll see that it’s also Round-Robin:

# esxcli storage nmp satp list

Name              Default PSP  
----------------- -----------
VMW_SATP_ALUA_CX  VMW_PSP_RR

There is, however, no default claim rule for Dell Compellent storage arrays. There are a handful of the following non array-specific “catch all” rules:

Name                 Transport  Claim Options Description
-------------------  ---------  ------------- -----------------------------------
VMW_SATP_ALUA                   tpgs_on       Any array with ALUA support
VMW_SATP_DEFAULT_AA  fc                       Fibre Channel Devices
VMW_SATP_DEFAULT_AA  fcoe                     Fibre Channel over Ethernet Devices
VMW_SATP_DEFAULT_AA  iscsi                    iSCSI Devices

As you can see, the default PSP for VMW_SATP_ALUA is Most Recently Used (MRU) and for VMW_SATP_DEFAULT_AA it’s VMW_PSP_FIXED:

Name                Default PSP   Description
------------------- ------------- ------------------------------------------
VMW_SATP_ALUA       VMW_PSP_MRU
VMW_SATP_DEFAULT_AA VMW_PSP_FIXED Supports non-specific active/active arrays

Compellent is not an ALUA storage array and doesn’t have the tpgs_on option enabled. As a result it’s claimed by the VMW_SATP_DEFAULT_AA rule for the iSCSI transport, which is why you end up with the Fixed path selection policy for all LUNs by default.

Changing the default PSP

Now let’s see how we can change the PSP from Fixed to Round Robin. First thing you have to do before even attempting to change the PSP is to check VMware Compatibility List to make sure that the round robin PSP is supported for a particular array and vSphere combination.

vmware_hcl

As you can see, round robin path selection policy is supported for Dell Compellent storage arrays in vSphere 6.0u2. So let’s change it to get the benefit of being able to simultaneously use all paths to Compellent controllers.

For Compellent firmware versions 6.5 and earlier use the following command to change the default PSP:

# esxcli storage nmp satp set -P VMW_PSP_RR -s VMW_SATP_DEFAULT_AA

Note: technically here you’re changing PSP not specifically for the Compellent storage array, but for any array which is claimed by VMW_SATP_DEFAULT_AA and which also doesn’t have an individual SATP rule with PSP set. Make sure that this is not the case or you may accidentally change PSP for some other array you may have in your environment.

The above will change PSP for any newly provisioned and connected LUNs. For any existing LUNs you can change PSP either manually in each LUN’s properties or run the following command in PowerCLI:

# Get-Cluster ClusterNameHere | Get-VMHost | Get-ScsiLun | where {$_.Vendor -eq
“COMPELNT” –and $_.Multipathpolicy -eq “Fixed”} | Set-ScsiLun -Multipathpolicy
RoundRobin

This is what you should see in LUN properties as a result:

compellent_psp_2

Conclusion

By default any LUN connected from a Dell Compellent storage array is claimed by NMP using Fixed path selection policy. You can change it to Round Robin using the above two simple commands to make sure you utilize all storage paths available to ESXi hosts.

vSphere 6 Dump / Syslog Collector: PowerCLI Script

November 17, 2015

This is a quick update for a post I previously wrote on configuring vSphere 5 Syslog and Network Dump Collectors. You can find it here. This post will be about the changes in version 6.

Scripts I reposted for version 5 no longer work for version 6, so I thought I’d do an update. If you’re looking just for the updated scripts, simply scroll down to the end of the post.

What’s new in vSphere 6

If you look at the scripts all that’s changed is the order and number of the arguments. Which is not overly exciting.

What’s more interesting is that with vSphere 6 Syslog and ESXi Dump Collectors are no longer a separate install. They’re bundled with vCenter and you won’t see them as separate line items in the vCenter installer.

What I’ve also noticed is that ESXi Dump Collector service is not started automatically, so make sure to go to the services on the vCenter VM and start it manually.

Dump Collector vCenter plugin doesn’t seem to exist any more as well. But you are still able to see Syslog Collector settings in vCenter.

syslog_dump_collectors

Another thing worth mentioning here is also the directories where the logs and dumps are kept. In vCenter 6 they can be found by these paths:

C:\ProgramData\VMware\vCenterServer\data\vmsyslogcollector

C:\ProgramData\VMware\vCenterServer\data\netdump\Data


PowerShell Get-EsxCli Cmdlet

Also want to quickly touch on the fact that the below scripts are written using the Get-EsxCli cmdlet to get a EsxCli object and then directly invoke its methods.  Which I find not very ideal, as it’s not clear what each of the arguments actually mean and because the script gets broken every time the number or order of the arguments changes. Which is exactly what’s happened here.

There are Set-VMHostSyslogConfig and Set-VMHostDumpCollector cmdlets, which use argument names such as -SyslogServer and -Protocol, which are self explanatory. I may end up rewriting these scripts if I have time. But at the end of the day both ways will get the job done.

Maybe one hint is if you’re lost and not sure about the order of the arguments, run this cmdlet on a EsxCli object to find out what each argument actually mean:

$esxcli.system.coredump.network | Get-Member

get-member

ESXi Dump Collector PowerCLI script:

Foreach ($vmhost in (get-vmhost))
{
$esxcli = Get-EsxCli -vmhost $vmhost
$esxcli.system.coredump.network.get()
}

Foreach ($vmhost in (get-vmhost))
{
$esxcli = Get-EsxCli -vmhost $vmhost
$esxcli.system.coredump.network.set($null, “vmk0”, $null, “10.10.10.10”, 6500);
$esxcli.system.coredump.network.set($true)
}

There are a couple commands to check the ESXi Dump Collector configuration, as it’s not always clear if it’s able to write a core dump until a PSOD actually happens.

First command checks if Dump Collector service on a ESXi host can connect to the Dump Collector server and the second one actually forces ESXi host to purple screen if you want to be 100% sure that a core dump is able to be written. Make sure to put the ESXi host into maintenance mode if you want to go that far.

# esxcli system coredump network check

# vsish
# set /reliability/crashMe/Panic

Syslog Collector PowerCLI script:

Foreach ($vmhost in (get-vmhost))
{
$esxcli = Get-EsxCli -vmhost $vmhost
$esxcli.system.syslog.config.get()
}

Foreach ($vmhost in (get-vmhost))
{
$esxcli = Get-EsxCli -vmhost $vmhost
$esxcli.system.syslog.config.set($null, $null , $null, $null, $null, $null, $null, $null, “udp://vcenter.domain.local:514”, $null, $null);
$esxcli.network.firewall.ruleset.set($null, $true, “syslog”)
$esxcli.system.syslog.reload()
}

For the Syslog Collector it’s important to remember that there’s a firewall rule on each ESXi host, which needs to be enabled (the firewall ruleset command in the script).

For the Dump Collector there’s no firewall rule. So if you looking for it and can’t find, it’s normal to not have it by default.

vSphere Dump / Syslog Collector: PowerCLI Script

March 12, 2015

Overview

If you install ESXi hosts on say 2GB flash cards in your blades which are smaller than required 6GB, then you won’t have what’s called persistent storage on your hosts. Both your kernel dumps and logs will be kept on RAM drive and deleted after a reboot. Which is less than ideal.

You can use vSphere Dump Collector and Syslog Collector to redirect them to another host. Usually vCenter machine, if it’s not an appliance.

If you have a bunch of ESXi hosts you’ll have to manually go through each one of them to set the settings, which might be a tedious task. Syslog can be done via Host Profiles, but Enterprise Plus licence is not a very common things across the customers. The simplest way is to use PowerCLI.

Amendments to the scripts

These scripts originate from Mike Laverick’s blog. I didn’t write them. Original blog post is here: Back To Basics: Installing Other Optional vCenter 5.5 Services.

The purpose of my post is to make a few corrections to the original Syslog script, as it has a few mistakes:

First – typo in system.syslog.config.set() statement. It requires additional $null argument before the hostname. If you run it as is you will probably get an error which looks like this.

Message: A specified parameter was not correct.
argument[0];
InnerText: argument[0]

Second – you need to open outgoing syslog ports, otherwise traffic won’t flow. It seems that Dump Collector traffic is enabled by default even though there is no rule for it in the firewall (former netDump rule doesn’t exist anymore). Odd, but that’s how it is. Syslog on the other hand requires explicit rule, which is reflected in the script by network.firewall.ruleset.set() command.

Below are the correct versions of both scripts. If you copy and paste them everything should just work.

vSphere Dump Collector

Foreach ($vmhost in (get-vmhost))
{
$esxcli = Get-EsxCli -vmhost $vmhost
$esxcli.system.coredump.network.get()
}

Foreach ($vmhost in (get-vmhost))
{
$esxcli = Get-EsxCli -vmhost $vmhost
$esxcli.system.coredump.network.set($null, “vmk0”, “10.0.0.1”, “6500”)
$esxcli.system.coredump.network.set($true)
}

vSphere Syslog Collector

Foreach ($vmhost in (get-vmhost))
{
$esxcli = Get-EsxCli -vmhost $vmhost
$esxcli.system.syslog.config.get()
}

Foreach ($vmhost in (get-vmhost))
{
$esxcli = Get-EsxCli -vmhost $vmhost
$esxcli.system.syslog.config.set($null, $null, $null, $null, $null, “udp://10.0.0.1:514”)
$esxcli.network.firewall.ruleset.set($null, $true, “syslog”)
$esxcli.system.syslog.reload()
}