Posts Tagged ‘vCenter’

Multiple vCenter Connections in PowerCLI

November 30, 2019

Connect-VIServer is a PowerCLI cmdlet which most of the PowerCLI scripts out there start with. It creates a connection to a vCenter server, which you can then use to run queries against a particular vSphere environment.

If you only need one vCenter connection, you don’t need to worry about how your subsequent PowerCLI cmdlets are ordered. They will all use this single vCenter by default for all requests. But if you need multiple simultaneous connections, you have to be more careful with you code or you can accidentally end up running commands against a wrong vCenter. Not a situation you want to find yourself in, especially if you’re making changes to the environment.

Goal of this blog post is to explain PowerCLI behaviour, when multiple vCenter connections are used. And how to best write your code to avoid common mistakes.

vCenter server parameter

If you are connected to more than one vCenter, the easiest way to specify which vCenter to use in a particular PowerCLI cmdlet is by using the -Server parameter. For example:

Get-VM -Server vcenter1.domain.local

By doing so, you will avoid any ambiguity in your code, since vCenter is always specified explicitly. This is the theory. In reality, I find, you will always have that one command where you forgot to provide -Server parameter, which will cause problems when you least expect it.

DefaultVIServer variable

If you’ve done any PowerCLI scripting before, you’ve most likely come across the $global:DefaultVIServer variable. When you connect to a vCenter using Connect-VIServer cmdlet, DefaultVIServer variable is set to that vCenter name. That way when you run PowerCLI cmdlets without using -Server parameter, they implicitly use vCenter from the DefaultVIServer variable as a target for the query. When you disconnect from the vCenter using Disconnect-VIServer, this variable is emptied.

The challenge with this approach is that the DefaultVIServer variable can only hold one vCenter name. If you connect/disconnect to/from multiple vCenter servers, you may end up in a situation where DefaultVIServer variable becomes empty, even though you still have an active vCenter connection. It’s easier to demonstrate it in the following script output:

Connecting to vCenter server vcenter1.domain.local
DefaultVIServer value: vcenter1.domain.local
Connecting to vCenter server vcenter2.domain.local
DefaultVIServer value: vcenter2.domain.local
Disconnecting from vCenter server vcenter2.domain.local
DefaultVIServer value:
Get-VM : 29/11/2019 6:17:41 PM Get-VM You are not currently connected to any servers. Please connect first using a Connect cmdlet.

As you can see, after we disconnect from the current default vCenter server vcenter2.domain.local, the variable becomes blank, until we connect to any other vCenter again. As a result, Get-VM cmdlet fails.

The error message is misleading. Connection is there and you can still run commands against the vcenter1.domain.local by specifying it in the -Server parameter. However, it defeats the purpose of DefaultVIServer variable, when using multiple simultaneous vCenter connections.

There is a way to fix that.

DefaultVIServer mode

This leads us up to the third option – changing DefaultVIServer mode. PowerCLI supports multiple default vCenter servers if you change DefaultVIServer to Multiple (default is Single):

Set-PowerCLIConfiguration -DefaultVIServerMode Multiple

As a result of this change, PowerCLI will start using DefaultVIServers array, which tracks all currently connected vCenters.

There are two implications of using Multiple connection mode:

  1. If you run a PowerCLI cmdlet without the -Server parameter, it will run against all connected vCenters at the same time – which is fine, as long as this is what you want.
  2. If you expect other users to run this script and they use Single connection mode, it can break your script. If that’s the case, make sure to explicitly set DefaultVIServer mode in the beginning of your script to avoid any unexpected behaviour.

Conclusion

Each option has its pros and cons. It’s up to you to choose what works best in your particular situation. But if you asked me, I would recommend disconnecting vCenter server session as soon as you no longer needed it. That way you can avoid any potential ambiguity in your code. Use multiple simultaneous vCenter connections only if you absolutely need it.

vSphere 6.0 REST API: A History Lesson

August 23, 2019

I’m glad to see how VMware products are becoming more and more automation-focused these days. NSX has always had rich REST API capabilities, which I can’t complain about. And vSphere is now starting to catch up. vSphere 6.5 was the first release where REST API started getting much more attention. See these official blog posts for example:

But not many people know that vSphere 6.5 wasn’t the first release where REST API became available. Check this forum thread on VMTN “Does vCenter 6.0 support RESTFUL api?”:

I think its only supported for 6.5 as below blogs has a customer asked the same question and reply is no..

It’s not entirely true, even though I know why the OP got a “No” answer. Let me explain.

vSphere 6.0 REST API

VMware started to make first steps towards REST API starting from 6.0 release. If you have a legacy vSphere 6.0 environment you can play with, you can easily test that by opening the following URL:

https://vcenter/rest/com/vmware/vapi/metadata/cli/command

You will get a long list of commands available in 6.0 release:

It may look impressive, but if you look closely you will quickly notice that they are all Content Library or Tagging related. Quote from the referenced blog post:

VMware vCenter has received some new extensions to its REST based API. In vSphere 6.0, this API set provides the ability to manage the Content Library and Tagging but now also includes the ability to manage and configure the vCenter Server Appliance (VCSA) based functionality and basic VM management.

That is right, in vSphere 6.0 REST API is very limited, you won’t get inventory data, backup or update API. All you can do is manage Content Library and Tagging, which, frankly, is not very practical.

Making REST API Calls

If Content Library and Tagging use cases are applicable to you or you are just feeling adventurous this is an example of how you can make a call to vSphere 6.0 REST API via Postman.

All calls are POST-based and action (get, list, create, etc.) is specified as a parameter, so pay close attention to request format.

First you will need to generate authentication token by making a POST call to https://vcenter/rest/com/vmware/cis/session, using “Basic Auth” for Authorization and you will get a token in response:

Then change Authorization to “No auth” and specify the token in “vmware-api-session-id” header in your next call. In this example I’m getting a list of all content libraries (you will obviously get an empty response if you haven’t actually created one):

Some commands require a body, to determine the body format use the following POST call to https://vcenter/rest/com/vmware/vapi/metadata/cli/command?~action=get, with the following body in JSON format:

{
	"identity": {
        "name": "get",
        "path": "com.vmware.content.library"
	}
}

Where “path” is the operation and “name” is the action from the https://vcenter/rest/com/vmware/vapi/metadata/cli/command call above.

If you’re looking for more detailed information, I found this blog post by Mitch Tulloch very useful:

Conclusion

There you have it. vSphere 6.0 does support REST API, it’s just not very useful, that’s why no one talks about it.

This blog post won’t help you if you are stuck in a stone age and need to manage vSphere 6.0 via REST API, but it at least gives you a definitive answer of whether REST API is supported in vSphere 6.0 and what you can do with it.

If you do find yourself in such situation, I recommend to fall back on PowerCLI, if possible.

[SOLVED] Migrating vCenter Notifications

January 6, 2018

Why is this a problem?

VMware upgrades and migrations still comprise a large chunk of what I do in my job. If it is an in-place upgrade it is often more straightforward. The main consideration is making sure all compatibility checks are made. But if it is a rebuild, things get a bit more complicated.

Take for example a vCenter Server to vCenter Server Appliance migration. If you are migrating between 5.5, 6.0 and 6.5 you are covered by the vCenter Server Migration Tool. Recently I came across a customer using vSphere 5.1 (yes, it is not as uncommon as you might think). vCenter Server Migration Tool does not support migration from vSphere 5.1, which is fair enough, as it is end of support was August 2016. But as a result, you end up being on your own with your upgrade endeavours and have to do a lot of the things manually. One of such things is migrating vCenter notifications.

You can go and do it by hand. Using a few PowerCLI commands you can list the currently configured notifications and then recreate them on the new vCenter. But knowing how clunky and slow this process is, I doubt you are looking forward to spend half a day configuring each of the dozens notifications one by one by hand (I sure am not).

I offer an easy solution

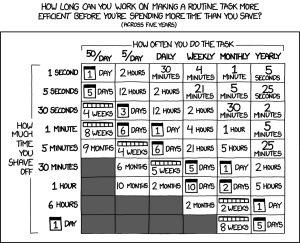
You may have seen a comic over on xkcd called “Is It Worth The Time?“. Which gives you an estimate of how long you can work on making a routine task more efficient before you are spending more time than you save (across five years). As an example, if you can save one hour by automating a task that you do monthly, even if you spend two days on automating it, you will still brake even in five years.

Knowing how often I do VMware upgrades, it is well worth for me to invest time in automating it by scripting. Since you do not do upgrades that often, for you it is not, so I wrote this script for you.

If you simply want to get the job done, you can go ahead and download it from my GitHub page here (you will also need VMware PowerCLI installed on your machine for it to work) and then run it like so:

.\copy-vcenter-alerts-v1.0.ps1 -SourceVcenter old-vc.acme.com -DestinationVcenter new-vc.acme.com

Script includes help topics, that you can view by running the following command:

Get-Help -full .\copy-vcenter-alerts-v1.0.ps1

Or if you are curious, you can read further to better understand how script works.

How does this work?

First of all, it is important to understand the terminology used in vSphere:

  • Alarm trigger – a set of conditions that must be met for an alarm warning and alert to occur.
  • Alarm action – operations that occur in response to triggered alarms. For example, email notifications.

Script takes source and destination vCenter IP addresses or host names as parameters and starts by retrieving the list of existing alerts. Then it compares alert definitions and if alert doesn’t exist on the destination, it will be skipped, so be aware of that. Script will show you a warning and you will be able to make a decision about what to do with such alert later.

Then for each of the source alerts, that exists on the destination, script recreates actions, with exact same triggers. Trigger settings, such as repeats (enabled/disabled) and trigger state changes (green to yellow, yellow to red, etc) are also copied.

Script will not attempt to recreate an action that already exists, so feel free to run the script multiple times, if you need to.

What script does not do

  1. Script does not copy custom alerts – if you have custom alert definitions, you will have to recreate them manually. It was not worth investing time in such feature at this stage, as custom alerts are rare and even if encountered, there us just a handful, that can be moved manually.
  2. Only email notification actions are supported – because they are the most common. If you use other actions, like SNMP traps, let me know and maybe I will include them in the next version.

PowerCLI cmdlets used

These are some of the useful VMware PowerCLI cmdlets I used to write the script:

  • Get-AlarmDefinition
  • Get-AlarmAction
  • Get-AlarmActionTrigger
  • New-AlarmAction
  • New-AlarmActionTrigger

Error When Deploying VCSA or PSC

October 31, 2017

Recently when helping a customer to deploy a new greenfield VMware 6.5 environment I ran into an issue where brand new vCenter Server Appliance and Platform Service Controller 6.5 build 5973321 fail to deploy to an ESXi host build 5969303.

Stage 1 (install) of the deployment completes successfully. In Stage 2 (setup) VCSA installer both for vCenter and PSC first shows a prompt asking for credentials.

PSC Issue Description

After providing credentials, when installing an external PSC, installation fails with the following error:

Error:
Unable to connect to vCenter Single Sign-On: Failed to connect to SSO; uri:https://psc-hostname/sts/STSService/vsphere.local
Failed to register vAPI Endpoint Service with CM
Failed to configure vAPI Endpoint Service at the firstboot time

Resolution:
Please file a bug against VAPI

Installation wizard shows the following resulting error:

Failure:
A problem occurred during setup. Refresh this page and try again.

A problem occurred during setup. Services might not be working as expected.

A problem occurred while – Starting VMware vAPI Endpoint…

Appliance shows the following error in console:

Failed to start services. Firstboot Error.

Alternatively PSC can fail with the following error:

Error:
Unexpected failure: }
Failed to register vAPI Endpoint Service with CM
Failed to configure vAPI Endpoint Service at the firstboot time

Resolution:
Please file a bug against VAPI

VCSA Issue Description

After providing credentials, when installing vCenter with embedded PSC, installation fails with the following error:

Error:
Unable to start the Service Control Agent.

Resolution:
Search for these symptoms in the VMware knowledge base for any known issues and possible workarounds. If none can be found, collect a support bundle and open a support request.

Installation wizard shows the following resulting error:

Failure:
A problem occurred during setup. Refresh this page and try again.

A problem occurred during setup. Services might not be working as expected.

A problem occurred while – Starting VMware Service Control Agent…

Appliance shows the same error in console.

Alternatively VCSA can fail with the following error:

Error:
Encountered an internal error. Traceback (most recent call last): File “/usr/lib/vmidentity/firstboot/vmidentity-firstboot.py”, line 1852, in main vmidentityFB.boot() File “/usr/lib/vmidentity/firstboot/vmidentity-firstboot.py”, line 359, in boot self.checkSTS(self.__stsRetryCount, self.__stsRetryInterval) File “/usr/lib/vmidentity/firstboot/vmidentity-firstboot.py”, line 1406, in checkSTS raise Exception(‘Failed to initialize Secure Token Server.’) Exception: Failed to initialize Secure Token Server.

Resolution:
This is an unrecoverable error, please retry install. If you run into this error again, please collect a support bundle and open a support request.

Issue Workaround

This issue happens when VCSA or PSC installation was cancelled and is attempted for the second time to the same ESXi host.

Identified workaround for this issue is to use another ESXi host, which has never been used to deploy PSC or VCSA to.

Issue Resolution

VMware is aware of the bug and working on the resolution.

First Look at AWS Management Portal for vCenter Part 2: Administration

June 30, 2017

aws_migrationIn part 1 of the series we looked at the Management Portal deployment. Let’s move on to an overview of the portal functionality.

Portal Dashboard

Once you open the portal you are asked to pick your region (region preferences can later be changed only from Web Client). You then proceed to the dashboard where you can see all instances you already have running in AWS. If you don’t see your VPCs, make sure the user you’re using to log in is on the list of administrators in AMP (user and domain names are case sensitive).

default_env

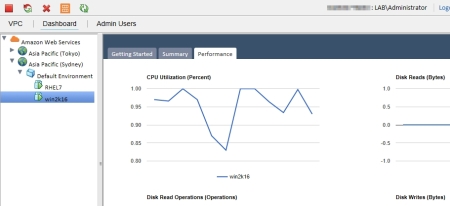
Here you can find detailed configuration information of each instance (Summary page), performance metrics (pulled from CloudWatch) and do some simple tasks, such as stopping/rebooting/terminating an instance, creating an AMI (Amazon Machine Image). You can also generate a Windows password from a key pair if you need to connect to VM via RDP or SSH.

Virtual Private Cloud Configuration

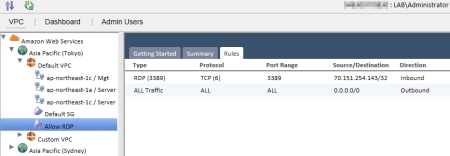
If the dashboard tab is more operational-focused, VPC tab is configuration-centric. Here you can create new VPCs, subnets and security groups. This can be handy if you want to add a rule to a security group to for instance allow RDP access to AWS instances from a certain IP.

edit_sg

If you spend most of the time in vCenter this can be helpful as you don’t need to go to AWS console every time to perform such simple day to day tasks.

Virtual Machine Provisioning

Portal supports simple instance provisioning from Amazon Machine Images (AMIs). You start with creating an environment (Default Environment can’t be used to deploy new instances). Then you create a template, where you can pick an AMI and specify configuration options, such as instance type, subnets and security groups.

create_template

Note: when creating a template, make sure to search for AMIs by AMI ID. AMI IDs in quick start list are not up-to-date and will cause instance deployment to fail with the following error:

Failed to launch instance due to EC2 error: The specified AMI is no longer available or you are not authorized to use it.

You can then go ahead and deploy an instance from a template.

Virtual Machine Migration

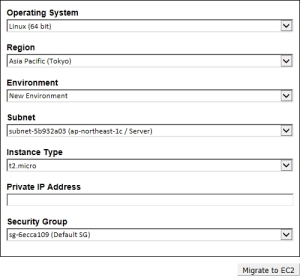
Saving the best for the last. VM migration – this is probably one of the coolest portal features. Right-click on a VM in vCenter inventory and select Migrate to EC2. You will be asked where you want to place the VM and how AWS instance should be configured.

ec2_migrate

When you hit the button AMP will first export VM as an OVF image and then upload the image to AWS. As a result, you get a copy of your VM in AWS VPC with minimal effort.

ec2_migration2

When it comes to VM migration to AWS, there is, of course, much more to it than just copying the data. Machine gets a new SID, which not all applications and services like. There are compatibility considerations, data gravity, network connectivity and others. But all the heavy lifting AMP does for you.

Conclusion

I can’t say that I was overly impressed with the tool, it’s very basic and somewhat limited. Security Groups can be created, but cannot be applied to running instances. Similarly, templates can be created, but not edited.

But I would still recommend to give it a go. Maybe you will find it useful in your day to day operations. It gives you visibility into your AWS environment, saving time jumping between two management consoles. And don’t underestimate the migration feature. Where other vendors ask for a premium, AWS Management Portal for vCenter gives it to you for free.

First Look at AWS Management Portal for vCenter Part 1: Deployment

December 18, 2016

Cloud has been a hot topic in IT for quite a while, for such valid reasons and benefits it brings as agility and economies of scale. More and more customers start to embark on the cloud journey, whether it’s DR to cloud, using cloud as a Tier 3 storage or even full production migrations for the purpose of shrinking the physical data center footprint.

vmware_aws

Even though full data center migrations to cloud are not that uncommon, many customers use cloud for certain use cases and keep other more static workloads on-premises, where it may be more cost-effective. What it means is that they end up having two environments, that they have to manage separately. This introduces complexity into operational models as each environment has its own management tools.

Overview

AWS Management Portal for vCenter helps to bridge this gap by connecting your on-premises vSphere environment to AWS and letting you perform basic management tasks, such as creating VPCs and security groups, deploying EC2 instances from AMI templates and even migrating VMs from vSphere to cloud, all without leaving the familiar vCenter user interface.

connector_architecture

Solution consists of two components: AWS Management Portal for vCenter, which is configured in AWS and AWS Connector for vCenter, which is a Linux appliance deployed on-prem. Let’s start with the management portal first.

Configure Management Portal

AWS Management Portal for vCenter or simply AMP, can be accessed by the following link https://amp.aws.amazon.com. Configuration is wizard-based and its main purpose is to set up authentication for vCenter users to be able to access AWS cloud through the portal.

aws_amp.jpg

You have an option of either using SAML, which has pre-requisites, or simply choosing the connector to be your authentication provider, which is the easiest option.

If you choose the latter, you will need to pre-configure a trust relationship between AWS Connector and the portal. First step of the process is to create an Identity and Access Management (IAM) user in AWS Management Console and assign “AWSConnector” IAM policy to it (connector will then use this account to authenticate to AWS). This step is explained in detail in Option 1: Federation Authentication Proxy section of the AWS Management Portal for vCenter User Guide.

add_admin

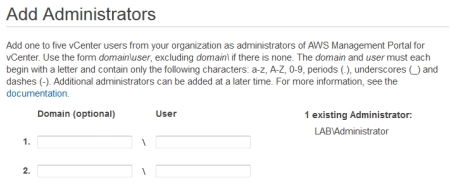
You will also be asked to specify vCenter accounts that will have access to AWS and to generate an AMP-Connector Key. Save your IAM account Access Key / Secret and AMP-Connector Key. You will need them in AWS Connector registration wizard.

Configure AWS Connector

AWS Connector is distributed as an OVA, which you can download here:

To assign a static IP address to the appliance you will need to open VM console and log in as ec2-user with the password ec2pass. Run the setup script and change network settings as desired. Connector also supports connecting to AWS through a proxy if required.

# sudo setup.rb

Browse to the appliance IP address to link AWS Connector to your vCenter and set up appliance’s password. You will then be presented with the registration wizard.

Wizard will ask you to provide a service account for AWS Connector (create a non-privileged domain account for it) and credentials of the IAM trust account you created previously. You will also need your trust role’s ARN (not user’s ARN) which you can get from the AMP-Connector Federation Proxy section of AWS Management Portal for vCenter setup page.

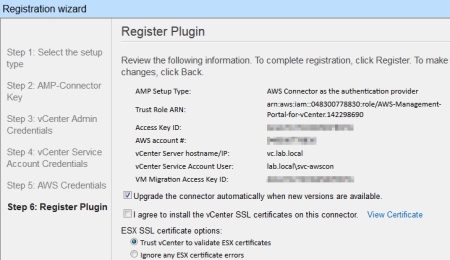
If everything is done correctly, you will get to the plug-in registration page with the configuration summary, which will look similar to this:

registration_complete

Summary

AWS Connector will register a vCenter plug-in, which you will see both in vSphere client and Web Client.

aws_wclient

That completes the deployment part. In the next blog post of the series we will talk in more detail on how AWS Management Portal can be leveraged to manage VPCs and EC2 instances.

How Admission Control Really Works

May 2, 2016

confusionThere is a moment in every vSphere admin’s life when he faces vSphere Admission Control. Quite often this moment is not the most pleasant one. In one of my previous posts I talked about some of the common issues that Admission Control may cause and how to avoid them. And quite frankly Admission Control seems to do more harm than good in most vSphere environments.

Admission Control is a vSphere feature that is built to make sure that VMs with reservations can be restarted in a cluster if one of the cluster hosts fails. “Reservations” is the key word here. There is a common belief that Admission Control protects all other VMs as well, but that’s not true.

Let me go through all three vSphere Admission Control policies and explain why you’re better of disabling Admission Control altogether, as all of these policies give you little to no benefit.

Host failures cluster tolerates

This policy is the default when you deploy a vSphere cluster and policy which causes the most issues. “Host failures cluster tolerates” uses slots to determine if a VM is allowed to be powered on in a cluster. Depending on whether VM has CPU and memory reservations configured it can use one or more slots.

Slot Size

To determine the total number of slots for a cluster, Admission Control uses slot size. Slot size is either the default 32MHz and 128MB of RAM (for vSphere 6) or if you have VMs in the cluster configured with reservations, then the slot size will be calculated based on the maximum CPU/memory reservation. So say if you have 100 VMs, 98 of which have no reservations, one VM has 2 vCPUs and 8GB of memory reserved and another VM has 4 vCPUs and 4GB of memory reserved, then the slot size will jump from 32MHz / 128MB to 4 vCPUs / 8GB of memory. If you have 2.0 GHz CPUs on your hosts, the 4 vCPU reservation will be an equivalent of 8.0 GHz.

Total Number of Slots

Now that we know the slot size, which happens to be 8.0 GHz and 8GB of memory, we can calculate the total number of slots in the cluster. If you have 2 x 8 core CPUs and 256GB of RAM in each of 4 ESXi hosts, then your total amount of resources is 16 cores x 2.0 GHz x 4 hosts = 128 GHz and 256GB x 4 hosts = 1TB of RAM. If your slot size is 4 vCPUs and 8GB of RAM, you get 64 vCPUs / 4 vCPUs = 16 slots (you’ll get more for memory, but the least common denominator has to be used).

total_slots

Practical Use

Now if you configure to tolerate one host failure, you have to subtract four slots from the total number. Every VM, even if it doesn’t have reservations takes up one slot. And as a result you can power on maximum 12 VMs on your cluster. How does that sound?

Such incredibly restrictive behaviour is the reason why almost no one uses it in production. Unless it’s left there by default. You can manually change the slot size, but I have no knowledge of an approach one would use to determine the slot size. That’s the policy number one.

Percentage of cluster resources reserved as failover spare capacity

This is the second policy, which is commonly recommended by most to use instead of the restrictive “Host failures cluster tolerates”. This policy uses percentage-based instead of the slot-based admission.

It’s much more straightforward, you simply specify the percentage of resources you want to reserve. For example if you have four hosts in a cluster the common belief is that if you specify 25% of CPU and memory, they’ll be reserved to restart VMs in case one of the hosts fail. But it won’t. Here’s the reason why.

When calculating amount of free resources in a cluster, Admission Control takes into account only VM reservations and memory overhead. If you have no VMs with reservations in your cluster then HA will be showing close to 99% of free resources even if you’re running 200 VMs.

failover_capacity

For instance, if all of your VMs have 4 vCPUs and 8GB of RAM, then memory overhead would be 60.67MB per VM. For 300 VMs it’s roughly 18GB. If you have two VMs with reservations, say one VM with 2 vCPUs / 4GB of RAM and another VM with 4 vCPUs / 2GB of RAM, then you’ll need to add up your reservations as well.

So if we consider memory, it’s 18GB + 4GB + 2GB = 24GB. If you have the total of 1TB of RAM in your cluster, Admission Control will consider 97% of your memory resources being free.

For such approach to work you’d need to configure reservations on 100% of your VMs. Which obviously no one would do. So that’s the policy number two.

Specify failover hosts

This is the third policy, which typically is the least recommended, because it dedicates a host (or multiple hosts) specifically just for failover. You cannot run VMs on such hosts. If you try to vMotion a VM to it, you’ll get an error.

failover_host

In my opinion, this policy would actually be the most useful for reserving cluster resources. You want to have N+1 redundancy, then reserve it. This policy does exactly that.

Conclusion

When it comes to vSphere Admission Control, everyone knows that “Host failures cluster tolerates” policy uses slot-based admission and is better to be avoided.

There’s a common misconception, though, that “Percentage of cluster resources reserved as failover spare capacity” is more useful and can reserve CPU and memory capacity for host failover. But in reality it’ll let you run as many VMs as you want and utilize all of your cluster resources, except for the tiny amount of CPU and memory for a handful of VMs with reservations you may have in your environment.

If you want to reserve failover capacity in your cluster, either use “Specify failover hosts” policy or simply disable Admission Control and keep an eye on your cluster resource utilization manually (or using vROps) to make sure you always have room for growth.

Implications of Ignoring vSphere Admission Control

April 5, 2016

no-admissionHA Admission Control has historically been on of the lesser understood vSphere topics. It’s not intuitive how it works and what it does. As a result it’s left configured with default values in most vSphere environments. But default Admission Control setting are very restrictive and can often cause issues.

In this blog post I want to share the two most common issues with vSphere Admission Control and solutions to these issues.

Issue #1: Not being able to start a VM

Description

Probably the most common issue everyone encounters with Admission Control is when you suddenly cannot power on VMs any more. There are multiple reasons why that might happen, but most likely you’ve just configured a reservation on one of your VMs or deployed a VM from an OVA template with a pre-configured reservation. This has triggered a change in Admission Control slot size and based on the new slot size you no longer have enough slots to satisfy failover requirements.

As a result you get the following alarm in vCenter: “Insufficient vSphere HA failover resources”. And when you try to create and boot a new VM you get: “Insufficient resources to satisfy configured failover level for vSphere HA”.

admission_error

Cause

So what exactly has happened here. In my example a new VM with 4GHz of CPU and 4GB of RAM was deployed. Admission Control was set to its default “Host Failures Cluster Tolerates” policy. This policy uses slot sizes. Total amount of resources in the cluster is divided by the slot size (4GHz and 4GB in the above case) and then each VM (even if it doesn’t have a reservation) uses at least 1 slot. Once you configure a VM reservation, depending on the number of VMs in your cluster more often than not you get all slots being used straight away. As you can see based on the calculations I have 91 slots in the cluster, which have instantly been used by 165 running VMs.

slot_calculations

Solution

You can control the slot size manually and make it much smaller, such as 1GHz and 1GB of RAM. That way you’d have much more slots. The VM from my previous example would use four slots. And all other VMs which have no reservations would use less slots in total, because of a smaller slot size. But this process is manual and prone to error.

The better solution is to use “Percentage of Cluster Resources” policy, which is recommended for most environments. We’ll go over the main differences between the three available Admission Control policies after we discuss the second issue.

Issue #2: Not being able to enter Maintenance Mode

Description

It might be a corner case, but I still see it quite often. It’s when you have two hosts in a cluster (such as ROBO, DR or just a small environment) and try to put one host into maintenance mode.

The first issue you will encounter is that VMs are not automatically vMotion’ed to other hosts using DRS. You have to evacuate VMs manually.

And then once you move all VMs to the other host and put it into maintenance mode, you again can no longer power on VMs and get the same error: “Insufficient resources to satisfy configured failover level for vSphere HA”.

poweron_fail

Cause

This happens because disconnected hosts and hosts in maintenance mode are not used in Admission Control calculations. And one host is obviously not enough for failover, because if it fails, there are no other hosts to fail over to.

Solution

If you got caught up in such situation you can temporarily disable Admission Control all together until you finish maintenance. This is the reason why it’s often recommended to have at least 3 hosts in a cluster, but it can not always be justified if you have just a handful of VMs.

Alternatives to Slot Size Admission Control

There are another two Admission Control policies. First is “Specify a Failover Host”, which dedicates a host (or hosts) for failover. Such host acts as a hot standby and can run VMs only in a failover situation. This policy is ideal if you want to reserve failover resources.

And the second is “Percentage of Cluster Resources”. Resources under this policy are reserved based on the percentage of total cluster resources. If you have five hosts in your cluster you can reserve 20% of resources (which is equal to one host) for failover.

This policy uses percentage of cluster resources, instead of slot sizes, and hence doesn’t have the issues of the “Host Failures Cluster Tolerates” policy. There is a gotcha, if you add another five hosts to your cluster, you will need to change reservation to 10%, which is often overlooked.

Conclusion

“Percentage of Cluster Resources” policy is recommended to use in most cases to avoid issues with slot sizes. What is important to understand is that the goal of this policy is just to guarantee that VMs with reservations can be restarted in a host failure scenario.

If a VM has no reservations, then “Percentage of Cluster Resources” policy will use only memory overhead of this VM in its calculations. Which is probably the most confusing part about Admission Control in general. But that’s a topic for the next blog post.


vSphere 6 Dump / Syslog Collector: PowerCLI Script

November 17, 2015

This is a quick update for a post I previously wrote on configuring vSphere 5 Syslog and Network Dump Collectors. You can find it here. This post will be about the changes in version 6.

Scripts I reposted for version 5 no longer work for version 6, so I thought I’d do an update. If you’re looking just for the updated scripts, simply scroll down to the end of the post.

What’s new in vSphere 6

If you look at the scripts all that’s changed is the order and number of the arguments. Which is not overly exciting.

What’s more interesting is that with vSphere 6 Syslog and ESXi Dump Collectors are no longer a separate install. They’re bundled with vCenter and you won’t see them as separate line items in the vCenter installer.

What I’ve also noticed is that ESXi Dump Collector service is not started automatically, so make sure to go to the services on the vCenter VM and start it manually.

Dump Collector vCenter plugin doesn’t seem to exist any more as well. But you are still able to see Syslog Collector settings in vCenter.

syslog_dump_collectors

Another thing worth mentioning here is also the directories where the logs and dumps are kept. In vCenter 6 they can be found by these paths:

C:\ProgramData\VMware\vCenterServer\data\vmsyslogcollector

C:\ProgramData\VMware\vCenterServer\data\netdump\Data


PowerShell Get-EsxCli Cmdlet

Also want to quickly touch on the fact that the below scripts are written using the Get-EsxCli cmdlet to get a EsxCli object and then directly invoke its methods.  Which I find not very ideal, as it’s not clear what each of the arguments actually mean and because the script gets broken every time the number or order of the arguments changes. Which is exactly what’s happened here.

There are Set-VMHostSyslogConfig and Set-VMHostDumpCollector cmdlets, which use argument names such as -SyslogServer and -Protocol, which are self explanatory. I may end up rewriting these scripts if I have time. But at the end of the day both ways will get the job done.

Maybe one hint is if you’re lost and not sure about the order of the arguments, run this cmdlet on a EsxCli object to find out what each argument actually mean:

$esxcli.system.coredump.network | Get-Member

get-member

ESXi Dump Collector PowerCLI script:

Foreach ($vmhost in (get-vmhost))
{
$esxcli = Get-EsxCli -vmhost $vmhost
$esxcli.system.coredump.network.get()
}

Foreach ($vmhost in (get-vmhost))
{
$esxcli = Get-EsxCli -vmhost $vmhost
$esxcli.system.coredump.network.set($null, “vmk0”, $null, “10.10.10.10”, 6500);
$esxcli.system.coredump.network.set($true)
}

There are a couple commands to check the ESXi Dump Collector configuration, as it’s not always clear if it’s able to write a core dump until a PSOD actually happens.

First command checks if Dump Collector service on a ESXi host can connect to the Dump Collector server and the second one actually forces ESXi host to purple screen if you want to be 100% sure that a core dump is able to be written. Make sure to put the ESXi host into maintenance mode if you want to go that far.

# esxcli system coredump network check

# vsish
# set /reliability/crashMe/Panic

Syslog Collector PowerCLI script:

Foreach ($vmhost in (get-vmhost))
{
$esxcli = Get-EsxCli -vmhost $vmhost
$esxcli.system.syslog.config.get()
}

Foreach ($vmhost in (get-vmhost))
{
$esxcli = Get-EsxCli -vmhost $vmhost
$esxcli.system.syslog.config.set($null, $null , $null, $null, $null, $null, $null, $null, “udp://vcenter.domain.local:514”, $null, $null);
$esxcli.network.firewall.ruleset.set($null, $true, “syslog”)
$esxcli.system.syslog.reload()
}

For the Syslog Collector it’s important to remember that there’s a firewall rule on each ESXi host, which needs to be enabled (the firewall ruleset command in the script).

For the Dump Collector there’s no firewall rule. So if you looking for it and can’t find, it’s normal to not have it by default.

Zerto Overview

March 6, 2014

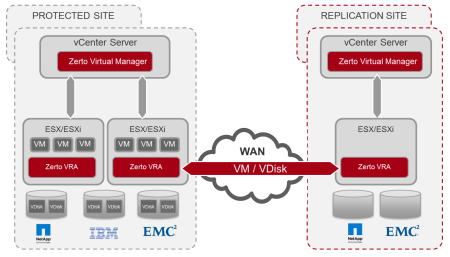
zerto-logoZerto is a VM replication product which works on a hypervisor level. In contrast to array level replication, which SRM has been using for a long time, it eliminates storage array from the equation and all the complexities which used to come along with it (SRAs, splitting the LUNs for replicated and non-replicated VMs, potential incompatibilities between the orchestrated components, etc).

Basic Operation

Zerto consists of two components: ZVM (Zerto Virtual Manger) and VRA (Virtual Replication Appliance). VRAs are VMs that need to be installed on each ESXi host within the vCenter environment (performed in automated fashion from within ZVM console). ZVM manages VRAs and all the replication settings and is installed one per vCenter. VRA mirrors protected VMs I/O operations to the recovery site. VMs are grouped in VPGs (Virtual Protection Groups), which can be used as a consistency group or just a container.

Protected VMs can be preseeded  to DR site. But what Zerto essentially does is it replicates VM disks to any datastore on recovery site where you point it to and then tracks changes in what is called a journal volume. Journal is created for each VM and is kept as a VMDK within the “ZeRTO volumes” folder on a target datastore. Every few seconds Zerto creates checkpoints on a journal, which serve as crash consistent recovery points. So you can recover to any point in time, with a few seconds granularity. You can set the journal length in hours, depending on how far you potentially would want to go back. It can be anywhere between 1 and 120 hours.Data-Replication-over-WAN

VMs are kept unregistered from vCenter on DR site and VM configuration data is kept in Zerto repository. Which essentially means that if an outage happens and something goes really wrong and Zerto fails to bring up VMs on DR site you will need to recreate VMs manually. But since VMDKs themselves are kept in original format you will still be able to attach them to VMs and power them on.

Failover Scenarios

There are four failover scenarios within Zerto:

  • Move Operation – VMs are shut down on production site, unregistered from inventory, powered on at DR site and protection is reversed if you decide to do so. If you choose not to reverse protection, VMs are completely removed from production site and VPG is marked as “Needs Configuration”. This scenario can be seen as a planned migration of VMs between the sites and needs both sites to be healthy and operational.
  • Failover Operation – is used in disaster scenario when production site might be unavailable. In this case Zerto brings up protected VMs on DR site, but it does not try to remove VMs from production site inventory and leave them as is. If production site is still accessible you can optionally select to shutdown VMs. You cannot automatically reverse protection in this scenario, VPG is marked as “Needs Configuration” and can be activated later. And when it is activated, Zerto does all the clean up operations on the former production site: shuts down VMs (if they haven’t been already), unregister them from inventory and move to VRA folder on the datastore.
  • Failover Test Operation – this is for failover testing and brings up VMs on DR site in a configured bubble network which is normally not uplinked to any physical network. VMs continue to run on both sites. Note that VMs disk files in this scenario are not moved to VMs folders (as in two previous scenarios) and are just connected from VRA VM folder. You would also notice that Zerto created second journal volume which is called “scratch” journal. Changes to the VM that is running on DR site are saved to this journal while it’s being tested.
  • Clone Operation – VMs are cloned on DR site and connected to network. VMs are not automatically powered on to prevent potential network conflicts. This can be used for instance in DR site testing, when you want to check actual networking connectivity, instead of connecting VMs to an isolated network. Or for implementing backups, cloned environment for applications testing, etc.

Zerto Journal Sizing

By default journal history is configured as 4 hours and journal size is unlimited. Depending on data change rate within the VM journal can be smaller or larger. 15GB is approximately enough storage to support a virtual machine with 1TB of storage, assuming a 10% change rate per day with four hours of journal history saved. Zerto has a Journal Sizing Tool which helps to size journals. You can create a separate journal datastore as well.

Zerto compared to VMware Replication and SRM

There are several replication products in the market from VMware. Standalone VMware replication, VMware replication + SRM orchestraion and SRM array-based replication. If you want to know more on how they compare to Zerto, you can read the articles mentioned in references below. One apparent Zerto advantage, which I want to mention here, is integration with vCloud Director, which is essential for cloud providers who offer DRaaS solutions. SRM has no vCloud Director support.

References