HCX Perftest Issue

May 9, 2021

Introduction

VMware HCX is a great tool, which simplifies VM migrations between on-prem to on-prem or on-prem to cloud at scale. I’ve worked with many different VM migration tools before and what I particularly like about HCX is it’s ability to stretch network subnets between source and destination environments. It reduces (or completely removes) the need to re-IP VMs, which simplifies the migration and reduces the risk of inadvertently introducing issues into migrated applications.

Perftest Tool

HCX is a complex set of technologies and getting initial deployment right is key to building a reliable migration fabric. Perftest is a CLI tool available on interconnect (IX) and network extension (NE) HCX appliances, which allows you to perform validation testing to ensure everything is functioning correctly, as well as provide you a performance baseline. To run this tool you will need to SSH into HCX Manager, enter CCLI and then go to one of your IX or NE appliances:

# ccli
# list
# go 0
# perftest all

Issue Description

There is one issue you can come across, when running perftest, where it partially completes with the following errors:

Message Error: map[string]interface {}{“grpc_code”:14, “http_code”:503, “http_status”:”Service Unavailable”, “message”:”rpc error: code = Unavailable desc = transport is closing”}

and

Internal failure happens. Err: http.Post(https://appliance_ip:9443/perftest/stoptest) return statusCode: 503

Solution

The reason for this error is blocked connectivity on port TCP/4500. HCX uses ports UDP/4500 and UDP/500 for establishing tunnels between IX and NE appliance pairs, but that’s not enough for perftest.

In the very beginning of the perftest it gives you a hint, but it’s easy to overlook. This requirement is not well documented (at least at the time of writing), so keep that in mind next time you deploy HCX.

vSphere Host Profiles: Using Customization Files

February 15, 2020

Overview

If you own vSphere Enterprise Plus licences, using vSphere Host Profiles is a no brainer. Even if you rarely add ESXi hosts to your cluster, why configure them by hand if you can do that by a few mouse clicks in a fast and consistent manner.

Host profiles are usually created by setting up one ESXi host according to your requirements and then capturing its state. Some settings in a host profile are unique to each host, which include the host name, VMkernel adapter network settings, user name for joining host to AD, etc. When you apply your profile to a new unprepared host, vCenter will ask you to specify these settings. This step is called host customization.

You can either type these settings manually or if you want to take your automation game one step further, you can use a customization file, which is simply the list of setting in .csv format.

This feature was first introduced in vSphere 6.5 and official documentation is a bit light on this topic. Purpose of this post is to close this gap by demonstrating where to find this configuration option.

Create

To create a customization file, right click on a ESXi host and choose Host Profiles > Export Host Customizations. This host has to have host profile already applied to it (including all customization settings), otherwise this option will be grayed out. This can be the first host you used to capture the original host profile.

Open .csv file in your editor of choice and change settings accordingly. If you adding multiple hosts to your cluster, you can write a script to generate multiple copies of this file for each new ESXi host you’re adding.

Apply

Host customization settings are specified (manually or using a customization file) when host profile is being applied to the host. So first right click on the host and choose Host Profiles > Attach Host Profile. Then on Customize hosts page import customization file by clicking on the Browse button:

Note: If you hit the “Host settings validation failed” error after applying host customizations, read my blog article here that explains the problem.

Conclusion

Pretty simple, isn’t it? Key is to not forget that customization file can be specified either when you are applying host profile or, alternatively, you can skip host customization step and use Host Profiles > Edit Host Customizations later. For host that doesn’t have a host profile associated with it, Edit Host Customizations option will always be greyed out.

Load Balancing Ansible Tower Using NSX

February 1, 2020

Disclamer: this configuration is not validated by either VMware or Red Hat. Make sure it is applicable to your use case and thoroughly test before implementing in production.

Overview

If you landed on this page I trust you already know what Ansible is. It’s a great configuration management tool centred around using YAML to describe the desired state configuration of your various infrastructure components. This desired state is captured in what Ansible calls playbooks, which once written, can then be used in a repeatable way to deploy brand new components or enforce configuration on already deployed ones.

Ansible can be installed and used from CLI, which is usually a good starting point. If you have multiple people using Ansible in your organization, you can also deploy AWX. It’s a free GUI add-on to Ansible, which makes managing concurrent user access to Ansible easier, by adding projects, schedules and credentials management. On top of that there is Ansible Tower. Ansible Tower is a paid version of AWX and gives you additional enterprise features and services like clustering, product support, validated upgrade paths, etc. In this article we will be focusing on Ansible Tower version of the product.

Also worth mentioning that this configuration will be based on Ansible Tower cluster feature, which lets you run all nodes as active/active. Prior to version 3.1 it was called redundancy and worked only in active/passive mode. Redundancy feature is deprecated and is outside the scope of this blog post.
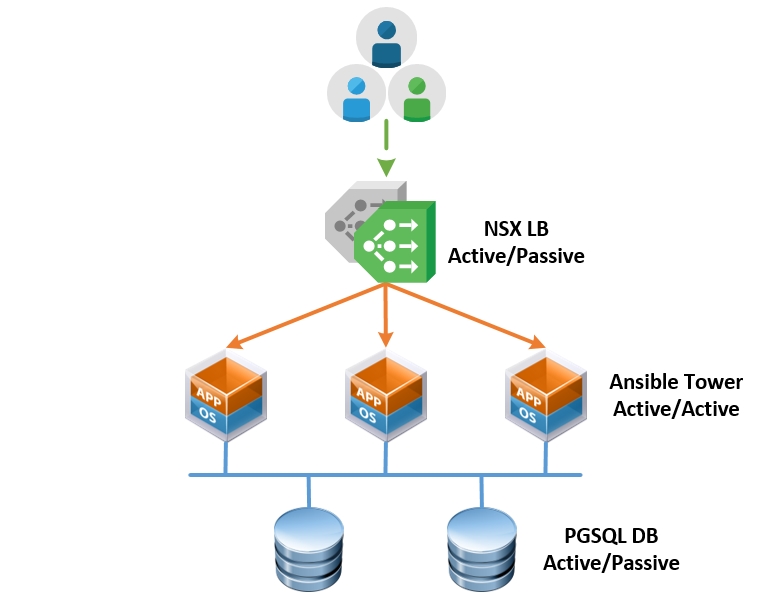
Topology

Deploying multiple Ansible Tower nodes in a cluster already gives you redundancy. If one of the nodes fails you can connect to another node, by just changing your browser URL. The benefit of having a load balancer is that you have one URL you can hit and if a node goes down, such situation is handled by load balancer automatically.

In this example we will be deploying a VMware NSX load-balancer in the following topology:

Configuration

Deploying an NSX load-balancer for HTTPS port 443 is simple, you can find numerous examples of how to create application profiles, monitors, pools and VIPs in official VMware documentation or out on the Internet. But with Ansible there’s one catch. If you try to use the default HTTPS monitor that NSX load balancer comes with, you will find HTTP 400 code in Ansible nginx logs:

10.20.30.40 - - [20/Jan/2020:04:50:19 +0000] "GET / HTTP/1.0" 400 3786 "-" "-" "-"
10.20.30.40 - - [20/Jan/2020:04:50:24 +0000] "GET / HTTP/1.0" 400 3786 "-" "-" "-"
10.20.30.40 - - [20/Jan/2020:04:50:29 +0000] "GET / HTTP/1.0" 400 3786 "-" "-" "-"

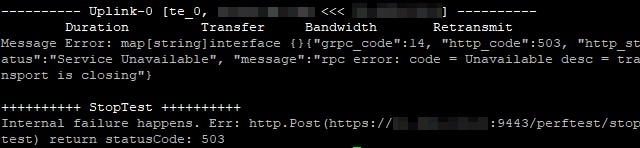
And an error in NSX load balancer health check:

As it turns out, when you make a HTTP request to Ansible Tower, specifying HTTP “Host” header is a requirement. Host header simply contains the hostname of the server you’re making a request to. Browsers add this header automatically, that’s why you’re not going to see any errors, when accessing Ansible Tower Using Firefox or Chrome. But NSX doesn’t add this header to the monitor checks by default, which makes Ansible Tower upset.

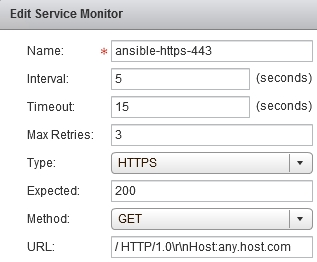
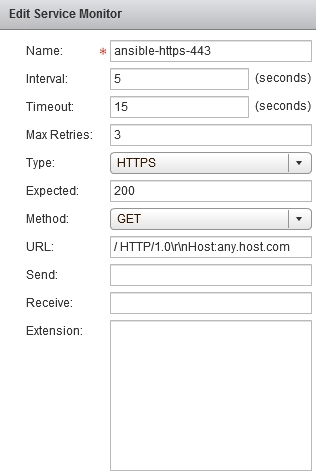
Here is the trick you need to do to make Tower happy:

Now nginx logs show success code 200:

10.20.30.40 - - [21/Jan/2020:22:54:42 +0000] "GET / HTTP/1.0" 200 11337 "-" "-" "-"
10.20.30.40 - - [21/Jan/2020:22:54:47 +0000] "GET / HTTP/1.0" 200 11337 "-" "-" "-"
10.20.30.40 - - [21/Jan/2020:22:54:52 +0000] "GET / HTTP/1.0" 200 11337 "-" "-" "-"

Load balancer health check is successful:

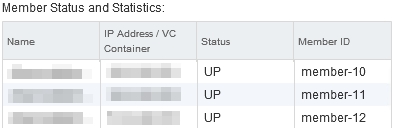
And pool members are up and reachable:

Note: technically the host header should contain the hostname of the Tower node we’re making a health check on. But since NSX monitor is configured per pool and not per pool member, we have to use a fake hostname “any.host.com” as a workaround. When I was testing it, Tower didn’t complain.

Reference

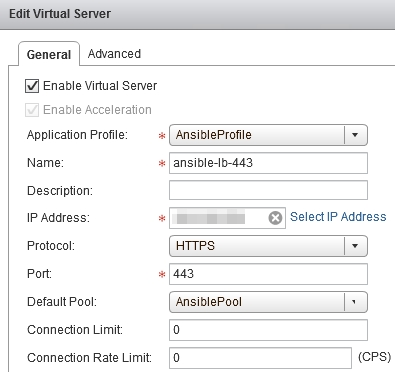
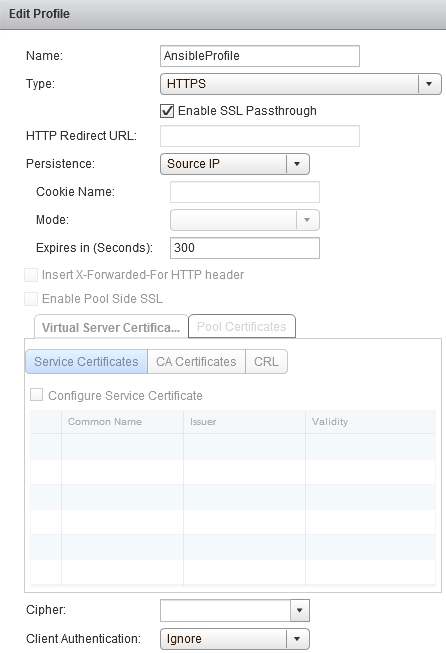
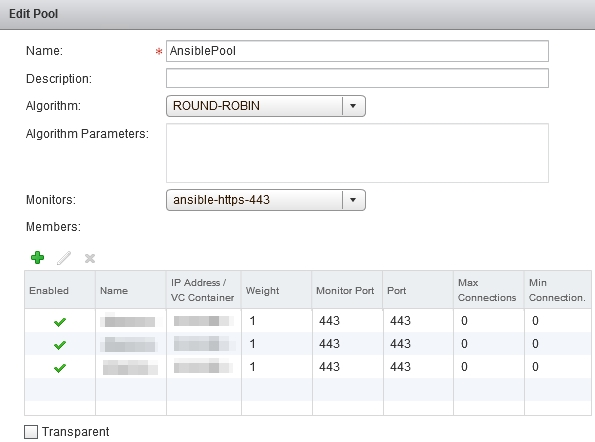
Even though I said that the rest of the load-balancer configuration is standard, I still think having screenshots for reference is helpful if you need to validate configuration. So find the full list of settings below.

Screenshot 1: Application Profile

Screenshot 2: Service Monitor

Screenshot 3: Pool

Screenshot 4: Virtual Server

Using VMware SDK Support

December 5, 2019

I predict this post will get a single hit over its lifetime, but if it helps at least one person desperately trying to find out how to open a VMware SDK support request, that’s good enough for me.

Quick Overview

Not everyone knows, but VMware, along with support for vSphere, NSX and all the other software products, also provides SDK and API support. If you are a partner developing a solution that integrates with a VMware product or even a customer writing your own vSphere plug-in using vSphere Management SDK, you can reach out to VMware for help.

It’s a paid service. You can find detailed description of it on its landing page here: VMware SDK and API Support

How to open SRs

One thing that is not very obvious about the SDK support is how to open support requests if you’re a customer. The goal of this short post is to demonstrate where to find it on VMware support portal:

  1. Log in to My VMware portal using your account credentials
  2. Under the Support section click Get Support
  3. On the opened page, under “Technical” category, choose your issue type, such as “Fault/Crash”
  4. In the provided list of Supported Products expand SDK Support Services
  5. Select VMware SDK Support
  6. Click Continue and proceed with describing your issue and opening the ticket, as usual

This is a screenshot of what it will look like, if your account has been entitled to SDK support:

If you’re working with SpringSource, there is also a range of support option under the SprinSource Open Source Support sub-category.

Conclusion

I’ve had only brief interaction with SDK Support team, but can only say good things about them. One of the examples was a question I had on parameter specifications of a particular vSphere Web Management SDK function and I not only got an answer to my question, but I was also provided with code snippets, which I didn’t even ask for. So if you are serious about using VMware SDKs and think you may require technical support, I can certainly recommend this service.

Multiple vCenter Connections in PowerCLI

November 30, 2019

Connect-VIServer is a PowerCLI cmdlet which most of the PowerCLI scripts out there start with. It creates a connection to a vCenter server, which you can then use to run queries against a particular vSphere environment.

If you only need one vCenter connection, you don’t need to worry about how your subsequent PowerCLI cmdlets are ordered. They will all use this single vCenter by default for all requests. But if you need multiple simultaneous connections, you have to be more careful with you code or you can accidentally end up running commands against a wrong vCenter. Not a situation you want to find yourself in, especially if you’re making changes to the environment.

Goal of this blog post is to explain PowerCLI behaviour, when multiple vCenter connections are used. And how to best write your code to avoid common mistakes.

vCenter server parameter

If you are connected to more than one vCenter, the easiest way to specify which vCenter to use in a particular PowerCLI cmdlet is by using the -Server parameter. For example:

Get-VM -Server vcenter1.domain.local

By doing so, you will avoid any ambiguity in your code, since vCenter is always specified explicitly. This is the theory. In reality, I find, you will always have that one command where you forgot to provide -Server parameter, which will cause problems when you least expect it.

DefaultVIServer variable

If you’ve done any PowerCLI scripting before, you’ve most likely come across the $global:DefaultVIServer variable. When you connect to a vCenter using Connect-VIServer cmdlet, DefaultVIServer variable is set to that vCenter name. That way when you run PowerCLI cmdlets without using -Server parameter, they implicitly use vCenter from the DefaultVIServer variable as a target for the query. When you disconnect from the vCenter using Disconnect-VIServer, this variable is emptied.

The challenge with this approach is that the DefaultVIServer variable can only hold one vCenter name. If you connect/disconnect to/from multiple vCenter servers, you may end up in a situation where DefaultVIServer variable becomes empty, even though you still have an active vCenter connection. It’s easier to demonstrate it in the following script output:

Connecting to vCenter server vcenter1.domain.local
DefaultVIServer value: vcenter1.domain.local
Connecting to vCenter server vcenter2.domain.local
DefaultVIServer value: vcenter2.domain.local
Disconnecting from vCenter server vcenter2.domain.local
DefaultVIServer value:
Get-VM : 29/11/2019 6:17:41 PM Get-VM You are not currently connected to any servers. Please connect first using a Connect cmdlet.

As you can see, after we disconnect from the current default vCenter server vcenter2.domain.local, the variable becomes blank, until we connect to any other vCenter again. As a result, Get-VM cmdlet fails.

The error message is misleading. Connection is there and you can still run commands against the vcenter1.domain.local by specifying it in the -Server parameter. However, it defeats the purpose of DefaultVIServer variable, when using multiple simultaneous vCenter connections.

There is a way to fix that.

DefaultVIServer mode

This leads us up to the third option – changing DefaultVIServer mode. PowerCLI supports multiple default vCenter servers if you change DefaultVIServer to Multiple (default is Single):

Set-PowerCLIConfiguration -DefaultVIServerMode Multiple

As a result of this change, PowerCLI will start using DefaultVIServers array, which tracks all currently connected vCenters.

There are two implications of using Multiple connection mode:

  1. If you run a PowerCLI cmdlet without the -Server parameter, it will run against all connected vCenters at the same time – which is fine, as long as this is what you want.
  2. If you expect other users to run this script and they use Single connection mode, it can break your script. If that’s the case, make sure to explicitly set DefaultVIServer mode in the beginning of your script to avoid any unexpected behaviour.

Conclusion

Each option has its pros and cons. It’s up to you to choose what works best in your particular situation. But if you asked me, I would recommend disconnecting vCenter server session as soon as you no longer needed it. That way you can avoid any potential ambiguity in your code. Use multiple simultaneous vCenter connections only if you absolutely need it.

Joining ESXi to AD in Disjoint Namespace

November 4, 2019

What is Disjoint Namespace?

Typically, when using Microsoft Active Directory you use AD-integrated DNS and your AD domain name matches you DNS domain name, but you don’t have to. This is quite rare, but I’ve seen cases where the two don’t match. For example, you might have a Linux-based DNS, where you register an esx01.example.com DNS record for your ESXi host and then you join it to an Active Directory domain called corp.local.

That’s called a disjoint namespace. You can read this Microsoft article if you want to know more details: Disjoint Namespace.

In my personal opinion, using a disjoint namespace is asking for trouble, but it will still work if you really want to use it.

Problem

If you end up going down that route, there’s one caveat you should be aware of. When you joining a machine to AD, among other things, it needs to populate DNS name field property of the AD computer object. This is an example of ESXi computer object in Active Directory Users and Computers snap-in:

If you configure example.com domain in your ESXi Default TCP/IP stack, like so:

And then you try to, for example, join your ESXi host to corp.local AD domain, it will attempt to use esx-01a.example.com for computer object DNS name field. If you’re using a domain account with privileges restricted only to domain join, this operation will fail.

This is how the problem manifested itself in my case in ESXi host logs:

Failed to run provider specific request (request code = 8, provider = ‘lsa-activedirectory-provider’) -> error = 40315, symbol = LW_ERROR_LDAP_CONSTRAINT_VIOLATION, client pid = 2099303

If you’re using host profiles to join ESXi host to the domain, remediation will fail and you will see the following in /var/log/syslog.log:

WARNING: Domain join failed; retry count 1.

WARNING: Domain join failed; retry count 2.

Likewise (ActiveDirectory) Domain Join operation failed while joining new domain via username and password..

Note: this problem is specific to joining domain using a restricted service account. If you use domain administrator account, it will force the controller to add the computer object with a DNS name, which doesn’t match the AD name.

Solution

Make sure ESXi domain name setting matches the Active Directory domain name, not DNS domain name. You can still use the esx-01a.example.com record to add the ESXi hosts to vCenter, but you have to specify corp.local domain in DNS settings (or leave it blank), because this is what is going to be used to add the host to AD, like so:

This way your domain controller will be happy and ESXi host will successfully join the domain.

Additional Notes

While troubleshooting this issue I saw a few errors in ESXi host logs, which were a distraction, ignore them, as they don’t constitute an error.

This just means that the ESXi host Active Directory service is running, but host is not joined to a domain yet:

lsass: Failed to run provider specific request (request code = 12, provider = ‘lsa-activedirectory-provider’) -> error = 2692, symbol = NERR_SetupNotJoined, client pid = 2111366

IPC is inter-process communication. Likewise consists of multiple services that talk to each other. They open and close connections, this is normal:

lsass-ipc: (assoc:0x8ed7e40) Dropping: Connection closed by peer

I also found this command to be useful for deeper packet inspection between an ESXi host and AD domain controllers:

tcpdump-uw -i vmk0 not port 22 and not arp

References

Host Profile Customization Issue

November 1, 2019

vSphere Host Profiles is a great feature for consistent ESXi host configuration and compliance checks, but can at times be flaky.

I’ve noticed an issue recently with Host Profiles in vSphere 6.7, where after providing host customization values the following error is shown in vSphere Web Client:

The “Update host customizations” operation failed for the entity with the following error message.

Host settings validation failed.

This is how the error message looks like in the client:

Even though it’s a bit annoying, I found it to be a furphy. Customizations are actually saved successfully and the error can be ignored. You can find the following messages in ESXi host’s /var/log/syslog.log file, which confirm that it works:


INFO: Execute completed
INFO: Validating AnswerFile Status1 = success
INFO: Cleaned up Host Configuration
INFO: GetAnswerFile completed

I’ve also found that this error doesn’t appear when you provide host customization values first time straight after attaching a profile to the host. Only when you update them. It also doesn’t show up in HTML5, only Web Client. I guess, one more reason to switch to HTML5.

Hope this blog post helps someone who searched in Google, but couldn’t find any information related to this error message.

Reminder: Disable Firewall on NSX ECMP Edge

October 15, 2019

ECMP and Stateful Services

It’s not new, this topic has already been discussed many times before, examples are here, here, here and here. When NSX Edges are configured in ECMP mode, none of the stateful services like VPN, NAT or Load Balancing are supported.

From NSX Design Guide:

In ECMP mode, only routing service is available. Stateful services cannot be supported due to asymmetric routing inherent in ECMP-based forwarding.

Even if you didn’t read documentation, but have networking skills, you’d know that protocols like NAT need to track network session state and even if you configure the same NAT rule on all of your ECMP-enabled edges, it won’t work, because due to ECMP, traffic can flow through one ESG on ingress and another ESG on egress. Since NAT tables are not synchronized, ESGs won’t be able to find the corresponding network flow in translation table and will drop the traffic.

ECMP and Firewall

But there’s another issue that doesn’t always come across or simply get forgotten about. You can deploy ESGs in ECMP mode, not configure any of the stateful services like VPN, NAT or LB, but still get network communication issues. Why? Because when you deploy an ESG, you always end up with firewall in enabled state. Firewall is also considered a stateful service.

From VVD 5.1 documentation:

SDDC-VISDN-032: For all ESGs deployed as ECMP North-South routers, disable the firewall. Use of ECMP on the ESGs is a requirement. Leaving the firewall enabled, even in allow all traffic mode, results in sporadic network connectivity. Services such as NAT and load balancing cannot be used when the firewall is disabled.

In fact, firewall is what actually tracks sessions and drops packets that don’t match existing network flows, not NAT itself. That’s also the reason why services like NAT and LB don’t work without firewall being enabled.

It often throws people off, because even having no rules in the firewall and setting default policy to accept will not prevent this issue from happening.

Demo

Here is a quick demonstration. I’m trying to establish an SSH session to a VM connected to a DLR behind two ESGs in ECMP mode.

I’m showing packet debug on both ESGs using the following command:

> debug packet display follow interface vNic_1 port_22

As you can see ingress traffic goes through E1 and egress traffic goes through E2:

E1: Packet Capture

E2: Packet Capture

Since session originated on E1, E2 interprets packets as invalid and immediately drops them:

From NSX Troubleshooting Guide:

Check for an incrementing value of a DROP invalid rule in the POST_ROUTING section of the show firewall command. Typical reasons include:

  • Asymmetric routing issues

Conclusion

It’s easy to end up in this situation, because firewall is enabled by default on a newly deployed ESG. And it’s hard to troubleshoot this issue, since it’s not quite obvious what’s actually going on unless you’ve already worked with ECMP before. So the best advice in this case is just to remember, if you want to use ECMP in NSX, make sure to disable firewall on ECMP-enabled ESGs. Use distributed firewall (DFW) instead.

Troubleshooting vSphere Guest Operations API

October 4, 2019

What is vSphere Guest Operations

Recently I’ve been heavily utilizing vSphere Guest Operations API for automating vCenter patching. vSphere Guest Operations (GuestOps) is an API, which allows you to run commands on a virtual machine without needing to connect to it over the network. All you need is credentials to the vCenter managing the virtual machine and to the virtual machine itself.

GuestOps can be called by using an Invoke-VMScript PowerCLI cmdlet in the following format:

> Invoke-VMScript -ScriptText “uname -a” -vm vc01 -GuestUser root -GuestPassword VMware1!

Cmdlet will talk to the vCenter, vCenter will talk to ESXi host, ESXi host will talk to VMware Tools and, eventually, VMware Tools will run the command on the Guest OS.

It worked well for me when I was running commands on VCSA 6.0 VM (managed by another vCenter), but after patching and upgrading this VM to VCSA 6.7 I encountered the following error:

Error occured while executing script on guest OS in VM ‘vc01’. Could not locate “Powershell” script interpreter in any of the expected locations. Probably you do not have enough permissions to execute command within guest.

It’s obvious from the error message that cmdlet is doing something wrong, since it’s supposed to use bash in Linux, not PowerShell.

Enable Debugging in VMware Tools

To better understand what was going on, I logged in to VCSA via SSH and enabled VMware Tools debugging (see KB1007873 for instructions on how to do that) and restarted Open VM Tools:

# systemctl restart vmtoolsd.service

After running the Invoke-VMScript cmdlet again, this is what I noticed in vmsvc.log debug log:

[vix] VixTools_StartProgram: User: root args: progamPath: ‘cmd.exe’, arguments: ‘/C powershell -NonInteractive -EncodedCommand cABvAHcAZQByAHMAaABl…

So it wasn’t just a misleading PowerCLI error message, Invoke-VMScript was actually trying to call a PowerShell command using Windows command interpreter on a Linux VM.

Solution

My guess is that since VMware has changed underlying operating system on VCSA from SUSE Linux to Photon OS, Invoke-VMScript can no longer properly identify the underlying OS and defaults to Windows.

Simple solution to this problem is to give a helping hand to Invoke-VMScript cmdlet and specify interpreter using -ScriptType Bash parameter. This is what a proper resulting debug log message will look like:

[vix] VixToolsStartProgramImpl: started ‘”/bin/bash” -c “bash > /tmp/vmware-root/powerclivmware159 2>&1 -c \”uname -a\””‘, pid 7456

Run CLI Commands on NSX Manager Using REST API

August 29, 2019

Over the last few years I’ve had a chance to work with NSX-V REST APIs in many different shapes and forms. Directly from vRealize Orchestrator and PowerShell/PowerNSX, indirectly from vRealize Automation or simply by making calls from Postman, which is sometimes required during NSX deployment and upgrades.

To date I haven’t been able to find any gaps in the API and can say only good things about it. It is very well documented. You can find detailed descriptions of all requests in NSX API Guide PDF or interactively browse it in API explorer on https://code.vmware.com.

But at the end of the day, NSX REST API is only a subset of what you can do from CLI and there are situations where it’s not sufficient. I’ll give you an example. Let’s say you want to know how much storage is available on NSX Manager appliance log partition. There’s a REST API call, which will give you a response similar to this:

GET https://nsxm/api/1.0/appliance-management/system/storageinfo

<storageInfo>
  <totalStorage>86G</totalStorage>
  <usedStorage>22G</usedStorage>
  <freeStorage>64G</freeStorage>
  <usedPercentage>25</usedPercentage>
</storageInfo>

As you can see, it answers the question of how much total space is available on the appliance, but doesn’t provide a full per partition breakdown available from the CLI via “show filesystem”:

Filesystem      Size  Used Avail Use% Mounted on
/dev/root       5.6G  1.2G  4.1G  23% /
tmpfs           7.9G  232K  7.9G   1% /run
devtmpfs        7.9G     0  7.9G   0% /dev
/dev/sda6        44G   19G   24G  44% /common
/dev/loop0       16G   45M   15G   1% /common/vdisk_mnt

So what are the options here? What is not widely known is that you can use NSX central command-line interface to remotely invoke appliance CLI commands using REST API.

Invoking CLI Commands

NSX REST API has a handy POST call https://nsxm/api/1.0/nsx/cli?action=execute. All you need to provide in addition to Authorization credentials using “Basic Auth” option is the following body in XML format:

<nsxcli>
  <command>show filesystem</command>
</nsxcli>

In response you will get a body in “text/plain” format, which is the only drawback of this method. You will need to parse the response in your scripting language of choice. In PowerShell, if you made the original call using Invoke-WebRequest cmdlet and saved it into the $response variable, it can look something like this:

$responseRows = $response.Content -split "`n"
foreach($row in $responseRows) {
  if($row -Like "*/dev/sda6*") {
    $pctUsed = $row.Split(" ",[StringSplitOptions]"RemoveEmptyEntries")[4]
    $pctUsedValue = $pctUsed.Substring(0, $pctUsed.Length-1)
    Write-Host "Space utilization on the log partition is $pctUsed."
    break
  }
}

Conclusion

For most use cases NSX REST API provides all the necessary information about NSX component configuration in structured JSON or XML format. This method is more of an exception rather than a rule, but it’s a nice tool to have in your tool belt, when you run out of options.